
Основні налаштування SchoolMate
На перелічених тут сторінках можна налаштувати параметри за замовчуванням для облікового запису вашого навчального закладу у SchoolMate.
Загальні дані:
Цей розділ зверху контролює, яка інформація відображається на сторінці входу SchoolMate у вашій школі. Більшість цих деталей будуть заповнені, коли ми налаштуємо ваш обліковий запис. Інші поля досить зрозумілі та дозволяють вам за потреби оновити основну інформацію вашої школи.
Заняття:
Ці налаштування допомагають покращити процес створення розкладу та переконатися, що графіки впорядковані.
- Ця функція контролює пункти, які з’являються в розділі “Розклад” на головній сторінці.
- Навчальні дні: оберіть дні тижня, коли проводяться заняття.
- Графік роботи: налаштуйте графік роботи вашої школи.
- Тривалість уроку за замовчуванням: дана тривалість автоматично встановлюються під час створення групи. Введіть тривалість уроку, яка найчастіше використовується у вашій школі.

Системна конфігурація:
В цьому розділі можна налаштувати, як функціонує SchoolMate згідно з вашими операційними потребами. Більшість опцій не потребують додаткових пояснень, але ми додали описи у разі питань. Налаштуйте ці опції, щоб покращити роботу вашої школи.
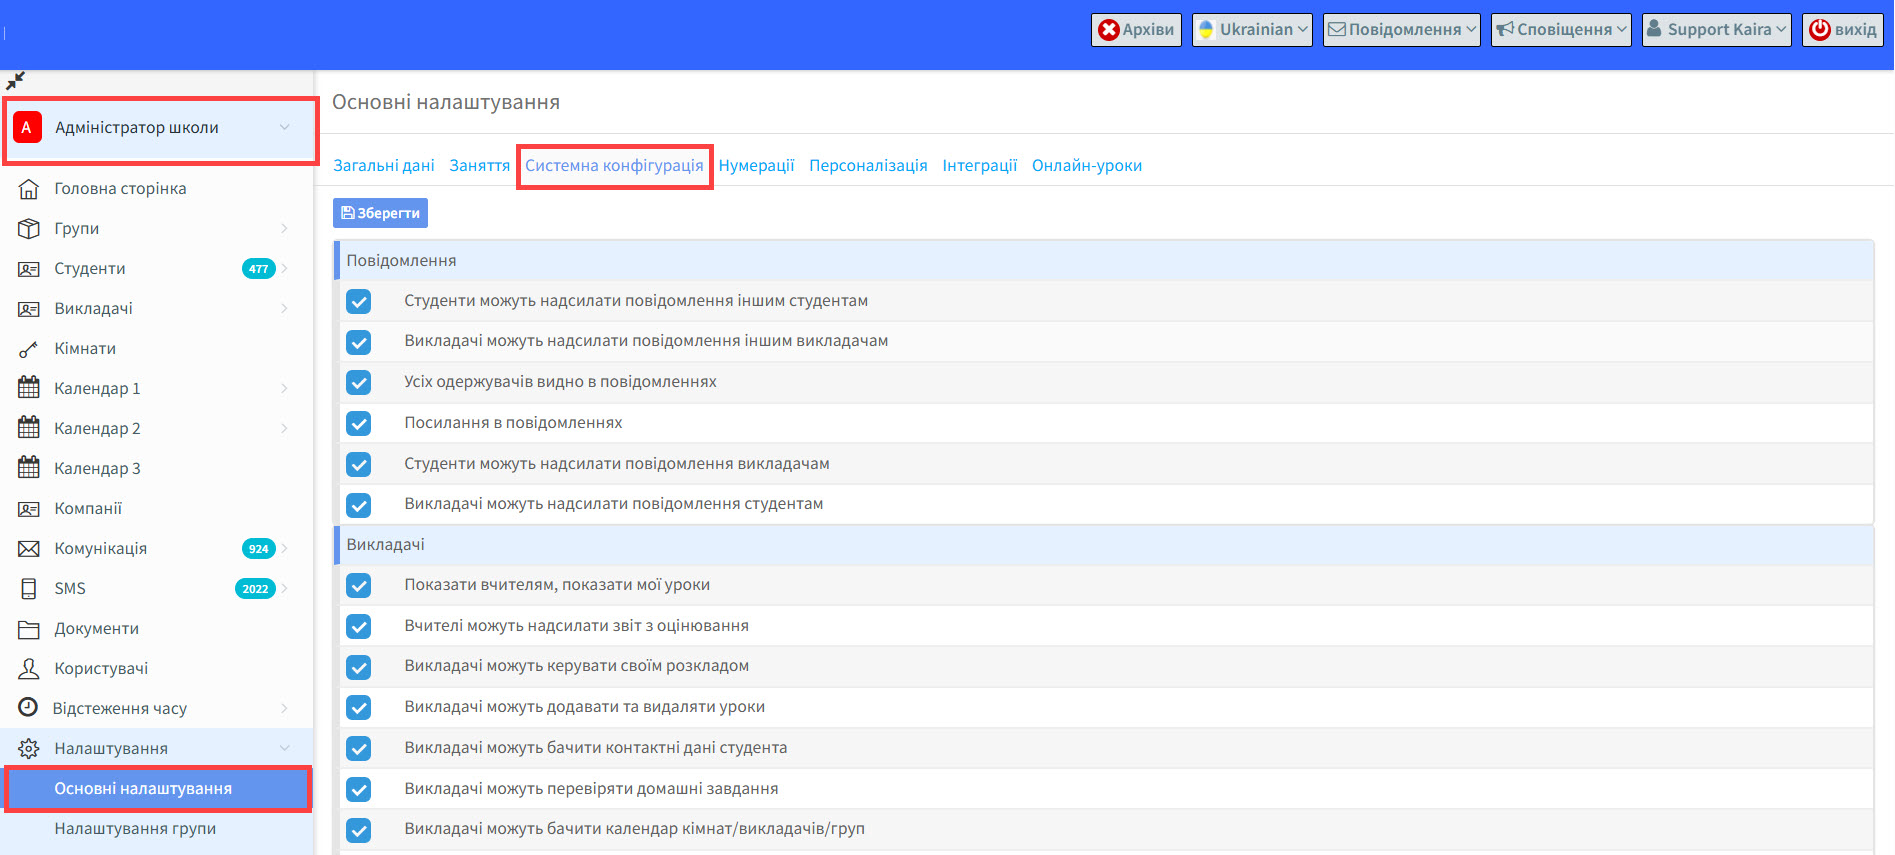
- Повідомлення:
-
- Студенти можуть надсилати повідомлення іншим студентам.
- Викладачі можуть надсилати повідомлення іншим викладачам.
- Всіх одержувачів видно в повідомлення.
- Посилання в повідомленнях: відправники повідомлень можуть включати URL-посилання у свої системні повідомлення.
- Студенти можуть надсилати повідомлення викладачам.
- Викладачі можуть надсилати повідомлення студентам.
- Викладачі: більшість функцій доступні викладачам для роботи після входу в обліковий запис SchoolMate. Посібники для викладачів можна переглянути тут.
- Показати вчителям, “показати мої уроки”. Коли ця функція ввімкнена, викладачі можуть переглядати інформацію, яку ввели інші викладачі, з якими вони проводять заняття в одній групі. Якщо ця функція деактивована, це означає, що викладач може переглянути лише свої уроки.
- Вчителі можуть надсилати звіт з оцінюванням. Коли ця функція ввімкнена, викладачі можуть надсилати електронним листом звіт з оцінюванням напряму студентам після створення..
- Викладачі можуть керувати своїм розкладом. Викладачі можуть змінювати дату та час занять та ставити статуси занять.
- Викладачі можуть додавати та видаляти уроки.
- Викладачі можуть бачити контактні дані студента – електронні адреси та номера телефонів.
- Викладачі можуть перевіряти домашнє завдання. Ця опція дозволяє викладачам вказувати чи студент виконав домашнє завдання, коли заповнюють деталі заняття.
- Викладачі можуть бачити календар кімнат/викладачів/груп.
- Викладачі діляться оцінками у групах.
- Викладачі можуть публікувати та скасовувати публікацію інформації про заняття. Це активує кнопку в розділі Заняття, щоб опублікувати деталі уроку та поділитися ними зі студентами в групі.
- Викладачі можуть бачити розташування класної кімнати.
- Архівовані уроки враховуються у розрахунках викладача. Ви зможете розрахувати ставку викладача, навіть коли група заархівована.
- Викладачі можуть редагувати свій профіль. Вони зможуть додавати та редагувати інформацію про свою освіту
- Зведений список студентів, що відображається для викладачів та компаній. Тут показано список студентів конкретного викладача.
- Викладачі можуть обрати дату для кожної оцінки. Це дозволяє викладачам вручну ввести дату, коли оцінка була виставлена.
- Керування групою:
- Створити групи контактів. Це дозволяє створити різні групи контактів та приєднати до них групи.
- Опція запланованих груп (дані не видно студентам і викладачам). Це корисно, якщо ви не хочете поки що показувати деталі групи та уроків.
- Призначення схеми оплати групі. Якщо ця функція активована, схеми оплати можна призначити автоматично всім студентам у групі.
- Місця зарезервовані та очікують у групі. Це створює список бронювань. Ця функція працює разом із цим налаштуванням тут.
- Показувати форму для налаштування розстрочки у групі. Ця опція вмикає або вимикає функцію «Створити розстрочку».
- Можливість архівувати заняття у групах.
- Конфлікти стосовно кімнати на уроці. Багато шкіл використовують одну аудиторію для проведення онлайн-уроків. Це може призвести до того, що в одній аудиторії одночасно відбуватимуться кілька уроків, що створює конфлікти. Якщо зняти галочку з цього поля, система ігноруватиме конфлікти з аудиторіями.
- Приховати модуль ресурсів. Приховує модуль «Ресурси» з меню вчителів та учнів після їхнього входу в систему.
- Підтвердьте ціну перезапису студента групи, коли ціна групи змінюється. Коли ви змінюєте наявну ціну для учня в групі, наприклад, із застосуванням знижки, система попросить вас підтвердити цю дію.
- Студент:
- Має доступ до додаткової інформації про студента. Це дозволяє студентам мати доступ та оновити картку Додатковаінформація, яка підʼєднана до картки студента.
- Активувати акаунти батьків. Це дозволяє створити деталі входу для батьків на картці студента.
- Генерувати логіни студентів із послідовними номерами.
- Відмітка про стан контракту учасника (підписаний/не підписаний).
- Показувати дні народження студентів на головній сторінці.
- Показувати додаткову інформацію про рівні студента у їхніх групах.
- Можна вибрати дні, коли студент відвідує заняття. Наприклад, якщо група має заняття двічі на тиждень, а учень відвідує заняття лише один день на тиждень, то, натиснувши цю кнопку, можна скасувати вибір дня, у який учень не відвідує заняття.
- Різне:
- Зберегти дату для створення наступних транзакцій. Якщо ви додаєте кілька платежів з однаковою датою заднім числом, ця опція дозволяє зберегти дату, введену у вікні редагування першої транзакції, та відображати (зберігати) її під час додавання наступних платежів.
- Показувати додаткову інформацію про календар кімнат/викладачів (файл XLS).
- Налаштування кольору в календарі. Ви можете вибрати різні кольори для мов, викладачів тощо, щоб їх було легше розпізнати в календарях.
- Показувати класну кімнату у списку занять.
- Показувати групи у списку студентів. Якщо цю опцію увімкнути, до налаштувань списку учнів додається колонка «Група».
- Активувати доступ батьків до акаунтів студентів. Якщо у вашій школі навчаються брати та сестри, це дозволяє об’єднати облікові записи, щоб батьки могли отримувати доступ до даних своїх дітей, використовуючи один логін.
- Перерахувати ставку студента при погодинній оплаті авансом. Система перерахує вартість, якщо ви зміните тривалість заняття.
- Генерувати розстрочки без округлення.
- Увімкнути відстеження часу. У деяких країнах Європейського Союзу вимагається ведення постійних, незмінних записів про відпрацьовані години всіх співробітників. Ця функція дозволяє їх створювати. Посібник можна знайти тут.
- Активувати для виставлення італійських електронних рахунків. Ця функція дозволяє школам завантажувати свої рахунки-фактури у форматі XML до бухгалтерської системи уряду Італії. Посібник можна знайти тут.
- Показати затверджену картку викладача. Викладачі можуть мати відповідну кваліфікацію для викладання в групі, але якщо група не бажає, щоб саме цей викладач її навчав, або викладач не бажає викладати для цієї групи, їх можна виключити з результатів пошуку. Докладніше про це читайте тут.
- Автоматична оплата товарів і послуг. Ця функція нагадуватиме вам про необхідність стягувати з учнів плату за певні позиції: підручники, реєстраційні внески під час обробки їхніх платежів. Більше інформації можна знайти тут.
- Дозволити декілька реквізитів інвойсу. Це дає школам можливість мати різні юридичні особи та виставляти рахунки-фактури й документи на різні назви. Ці юридичні особи додаються в розділі «Фінанси» — «Налаштування» — Реквізити емітента».
Нумерації:
Налаштування нумерації дозволяють вам створити схеми нумерації, які ви хочете застосувати до ваших фінансових документів та контрактів. Ви не зможете створити документ допоки не буде створена схема нумерації для цього типу документа.
- Деякі послуги, які надаються школою мають оподатковуватися, а деякі ні (або інвойс виставляється через іншу юридичну особу). Через це, школи часто працюють під декількома фізичними/юридичними особами, коли видають документи. Якщо у вас підключена функція “Дозволити декілька деталей інвойсу” у Налаштуваннях (Див. Пункт 13 вище), ви можете обрати фізичну/юридичну особу, до якої бажаєте додати схему нумерації.
- Натисніть “Додати”.
- Дайте назву документа для якого ви збираєтесь створити схему нумерації.
- Оберіть тип документа.
- Оберіть коли номер документа має знову починатися з 1. (Див. Розширені налаштування внизу).
- Створіть формат нумерації для документа. Щоб створити формат, натисніть на значення “номер”, “місяць”, та “рік”. Ці значення потім з’являться у полі шаблону. Ви можете змінити послідовність значень. Ви також можете відділити значення косою рискою або додати префікс (наприклад, INV: {номер}/{місяць}/{рік}.
- Коли ви закінчили, натисніть “Зберегти”.
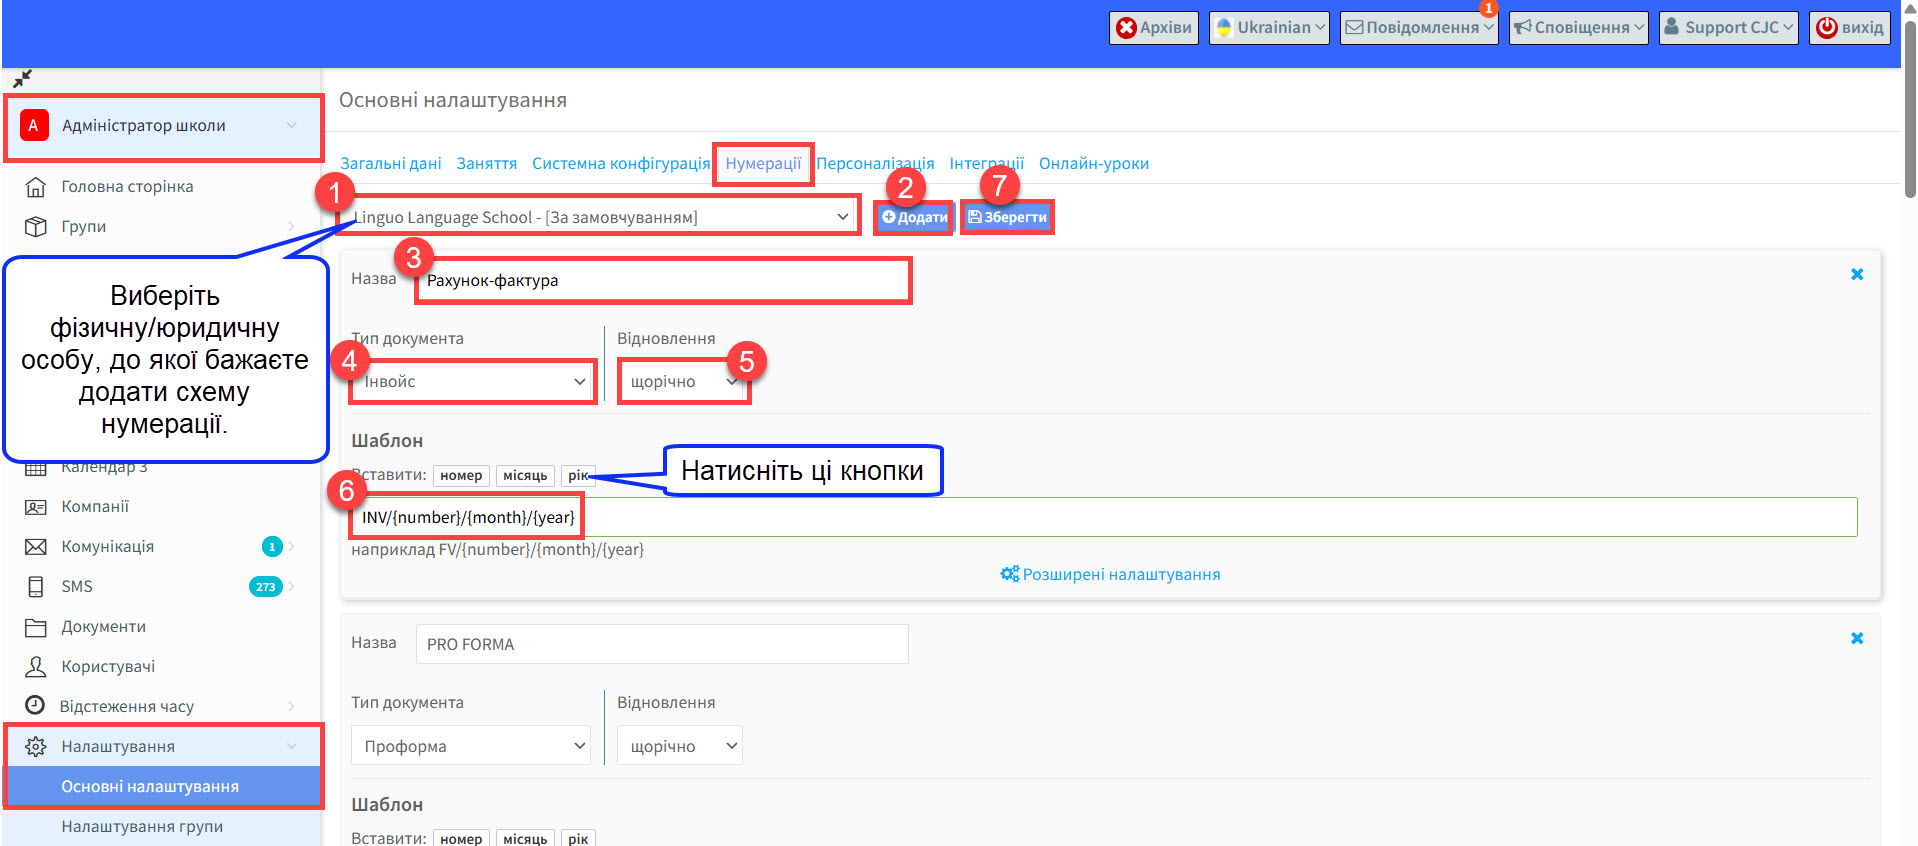
Розширені налаштування: в цьому розділі ми даємо команду системі щодо формату нумерації.
Якщо ви обрали щорічне відновлення у пункті 5 вище, ви побачите наступне:
- Дата з – дата, коли ви починаєте користуватися документом
- Дата до – дата, коли ви закінчуєте користуватися документом
- Рік – який рік зазначається у форматі нумерації. Вам необхідно змінити це в кінці року.
- Номер – з якого номеру ви хотіли б почати виставляти рахунки. Якщо ви переходите до SchoolMate, у вас можуть бути додаткові номери, яких необхідно дотримуватися.

Якщо ви обрали щомісячне відновлення у пункті 5 вище, ви побачите наступне:
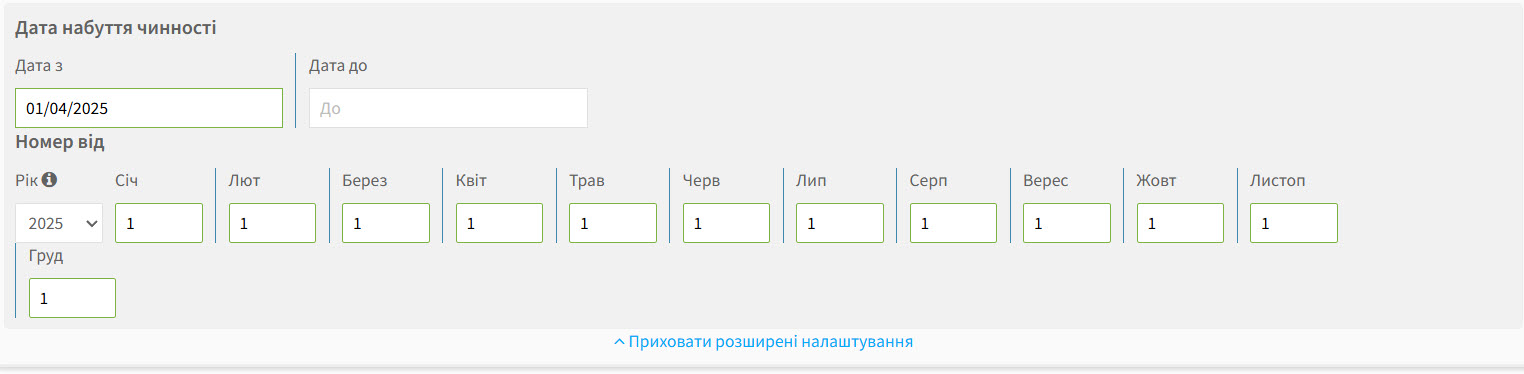
The principal is the same as outlined in annual resumption.
Персоналізація:
- Кольори: це дозволяє вам обирати кольори фону, які бачать користувачі, коли заходять в обліковий запис вашої школи.
- Вхід: ви можете розташувати кнопку входу на сайті вашої школи, на яку натискатимуть користувачі, щоб перейти на сторінку входу в SchoolMate. Тут ви можете обрати колір та розмір кнопки та скопіювати та вставити код у сайт.
Інтеграції:
- HubSpot
Завдяки API до вашого SchoolMate акаунту можна під’єднати HubSpot, що є просунутим CRM- сервісом. Ви можете дізнатися, як інтегрувати ваш SchoolMate акаунт із HubSpot тут.
- BinoTel
Binotel – це ще одна просунута CRM-система, яка є популярною у деяких країнах. Ви можете дізнатися, як інтегрувати ваш SchoolMate акаунт із Binotel тут.
Онлайн-уроки:
SchoolMate можна інтегрувати із декількома платформами онлайн-зустрічей, якщо ви проводите заняття онлайн (Zoom, LearnCube, Google Meets і Microsoft Teams).
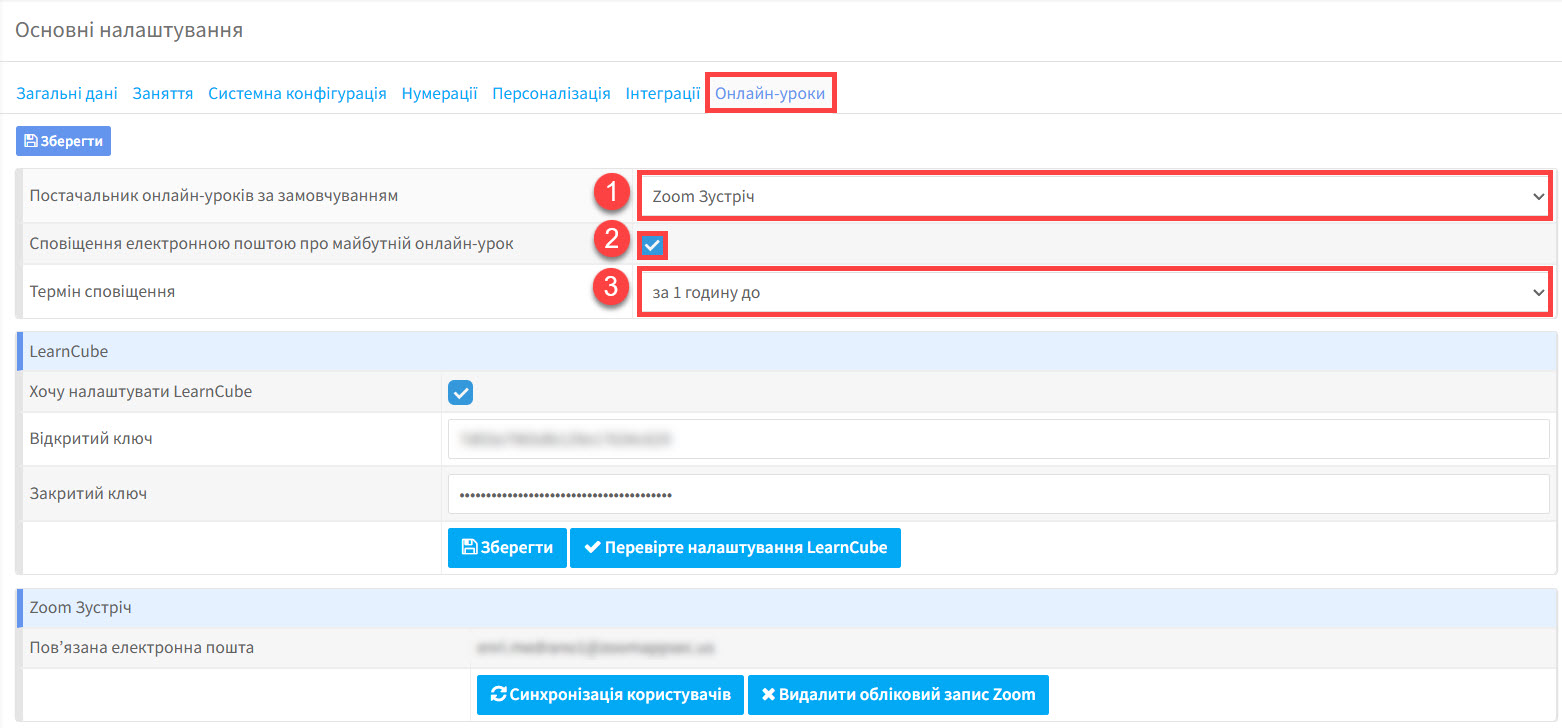
По-перше, треба переглянути верхню частину картки:
- Постачальник онлайн-уроків за замовчуванням. Ви можете використовувати будь-яку або всі 4 платформи у вашому обліковому записі SchoolMate. Це вибір за замовчуванням, тому вкажіть вашу головну платформу тут.
- Система надішле студентам та викладачам посилання на урок, як нагадування наперед через електронну пошту. Вам необхідно вказати налаштування електронної пошти у вашому обліковому записі SchoolMate, щоб це працювало належним чином. Посібник можна знайти тут.
- Якщо ви відмітили пункт 2 вище, тут ви можете обрати наскільки наперед перед початком уроку надіслати нагадування.
Різні платформи:
У випадку Google Meets та Microsoft Teams, ви додаєте посилання на онлайн-урок, коли його створюєте. Посібник можна знайти тут.
Для LearnCube та Zoom необхідна повна інтеграція, яка додана у нижній частині картки. У нас є окремі посібники щодо інтеграції з цими платформами.
Ви можете дізнатися як інтегрувати ваш SchoolMate акаунт із Learn Cube тут.
Ви можете дізнатися як інтегрувати ваш SchoolMate акаунт із Zoom тут.